Header

lundi 6 janvier 2014

FOR A CHANGE

I know it's been a while since I last posted a little something here. I was just putting myself under a lot of pressure by wanting to post regularly and create the most interesting content ever but I feel like I couldn't be happy in those conditions. I will still be trying my best but without forcing myself to post because it's been weeks since I last did it.
I also never actually like the name of Beauty Aromers and never acutally wanted to restrict myself to pure Beauty posts so I decided it was time to create another blog that would be more me.
If you're interested in following my path and see what I'm up to now, you can go and check my new blog :) I will allow myself to post about anything I like, in any sort of fashion and it should be fun!


CLICK HERE OR BELOW TO GO AND CHECK MY NEW BLOG


vendredi 8 mars 2013

DIY: HOW TO JAZZ UP A BORING TABLE (easy)


I'm so happy to tell you about this little and easy DIY I've come up with a few days ago.
I've had this simple black table from Ikea for years and was finding it a bit boring. I've recently bought this fabric to make myself some cushions and when I laid it on my table to take the photos for my last article, I figured it would be actually really nice as a sort of'cover'. So I've come up with this fairly simple DIY. I'll take you through the different steps but I'm assuring you anyone can do this!

What you need:
• A piece of fabric of your choice.
• A table (or any surface you may want to cover: desk, shelf, etc.)
• Thread (with a colour matching the fabric)
• Sewing Machine (or a needle if you're patient enough!)
• A tape measure


Step 1: MEASURING & CUTTING YOUR FABRIC
• Measure the surface you work with.
Mine had a square shape so it was fairly simple.
It was measuring 55cm, I added 5cm on each side for it to match the height I wanted to cover, and 1,5cm for the hem.
So basically, the "lines" you can see below represent the shape of the table and the rest represents the sides.
• Cut in your fabric


Step 2: SEWING THE HEMS
• Fold the fabric and pin it so you can sew the hems. (approximately 1,5cm)


Step 3: SEW THE SIDES
• Measure 5cm from the top and the left of each corner
• Mark the back of you fabric very lightly with chalk or pen (make sure you can't see the mark on the right side of your fabric)
• Fold your square into a triangle for each corner, the wrong side showing so you can see the little marks. Your marks should be on the fold.
• Sew from one mark to the place where the two parts of the fabric meet. (see below)


Last Step: FINISHING TOUCHES
• If you want to, you can cut the little triangles formed by the seam. I personally didn't, just it case I wanted to play with it again or widened it in case it didn't fit.
• Place the cover on top of your table and Voilà!


I hope I made myself clear enough so you can give it a try! It is very simple but very nice to jazz up a boring table. I'm very happy with it and hope you'll be too!
Let me know if you've tried it and tweet me your pictures at @beautyaromers

Enjoy your weekend
& Good Luck!

Margaux

dimanche 3 mars 2013

REVIEW: THE REAL TECHNIQUES BRUSHES


Yes I am finally reviewing the Samantha Chapman Real Techniques Brushes. I've had them for months and did not know if it would be interesting for me to review them as a lot of people have been raving about them but since I love them very much, I think they deserve another positive one :)
I bought two kits from the iHerb website. The brushes are all synthetic and have not been tested on animals.


• Base Shadow Brush
It is a flat but fluffy brush with a round top. It should be used to apply eyeshadow all over the lid but definitely feels like a blending brush. It is said to have quite the same shape and use as a Mac 217, which I personally do not own (yet). It has the perfect size to go through the crease and blends nicely. Definitely the winner of the kit.
• Deluxe Crease Brush
This is a rounded and very fluffy brush that should be used to apply makeup onto the crease of the eye. I've used it that way at first but wasn't completely happy with the precision it brought to my makeup. I saw the Pixiwoo sisters using it as a concealer brush. I'm not a massive user of concealer but when I need it and want a very natural finish, this is the brush I use. Because of its "fluffyness", it is very good to blend the product without wiping it away. 
• Accent Brush
At first, we all seemed to be quite reluctant to this brush thinking that it didn't have enough use to it. It is perfect to apply makeup under the eye or to highlight your inner corner BUT I found another PERFECT use to it. I don't know about you but sometimes I want a very natural and smoky finish to my eyeliner and this is the perfect tool for this. It is very small but very precise as it is very flat. Love it!
• Brow Brush
This angled brush is quite dense and thick so it is definitely meant to be used for eyebrows and nothing else. There isn't a lot to say about it. It is a nice brush.
• Pixel Point Eyeliner Brush
Right. When I bought the kit, I thought this brush would be much thinner, I was slightly disappointed but managed to use it anyway. You cannot draw a very fine line with it but if you use gel liner and dip the brush into the product as if it was a flat brush you can still draw a line that won't be too big using the side of it. It is hard to explain with words but I'm sure you'll find your own way to use this eyeliner brush.


• Buffing Brush
Again, I'm starting this review with the winner of the kit. This brush is very fluffy and an absolute pleasure in terms of softness. It has a flat top (very slightly rounded). I think all the bloggers and youtubers will agree and claim that this brush is fantastic to apply liquid foundation. I used to use it for blush but the results weren't as impressive as with foundation. Absolutely adore it for the natural finish it gives to the skin.
• Contour Brush
Another winner of this kit is this contour brush. It has a pointed and very fluffy head and is very nice to apply blush and highlight even though a bigger brush would be even more perfect for this or contouring. I still very much appreciate it and use it every single day.
• Pointed Foundation Brush
I'm not a massive fan of this type of foundation brushes. I think the flatness of them leaves traces on the skin which doesn't look natural at all. I rarely use this brush as I can't find a use I like to it. Feel free to tell me how you use it!
Detailer Brush
This brush has the same shape as the foundation brush which still isn't the best to apply makeup naturally but since it is much smaller, I managed to found different uses to it. It is very good to hide any little imperfection of to apply lipstick with precision.


Overall, I absolutely love those brushes. You received the two kits with a "Makeup up holder" type thing that you can fold and use as a stand when you work with the brushes which is always a plus. I always take this with me when I am on the go. I try to clean my brushes as often as I can and those are a pleasure to clean. They don't lose any hair or anything which is always good :)
I now want to purchase the Blush Brush -which would be perfect to apply blush, contour and blend all that very nicely- the Powder Brush and the Fine Liner Brush :)
I recommend these brushes very much and hope you won't be disappointed with them if you decided to go for it. In the end, they are cheap but really good brushes, an absolute bargain!

What did you think of them?

Margaux

samedi 16 février 2013

HAPPINESS WITHIN REACH


Because I've been feeling happier recently, I thought it was time I write a very positive post.
A new year has only just started and it is time we take the good in life, enjoy ourselves as much as possible and be who we are without anything stupid stopping us from doing so.
Taking time to do things I like and create in order to bloom and be happy is something I am going to try to achieve this year. I would be absolutely delighted to have people around me doing the same and I hope I can spread the positive energy.
Therefore, I need to stop some things I hate about me and start living for real. And as I am a listographer, you know what is following...

THINGS I NEED TO STOP
Prevent myself from being who I am in fear that people may not appreciate the real me
Expect too much from people
Being afraid of exploring and experimenting the unknown.

THINGS I NEED TO DO
Open myself up to people (friends and family)
Being able to talk about myself without feeling selfish and egocentric.
Accept myself and stop complaining
Make the best of little pleasures to truly find happiness and fulfillment

This is a very intimate post. I can't go through details too much because there are so many things I want to achieve that even I am confused. I really hope this positive energy will remain in the future because this little glimpse of happiness just feels very new but good.

Good luck everyone.


Margaux


samedi 9 février 2013

VALENTINE'S DAY COOKING AND MORE


Hello Everyone!
Today's post is going to be a little different as I'm going to start off with some cooking!
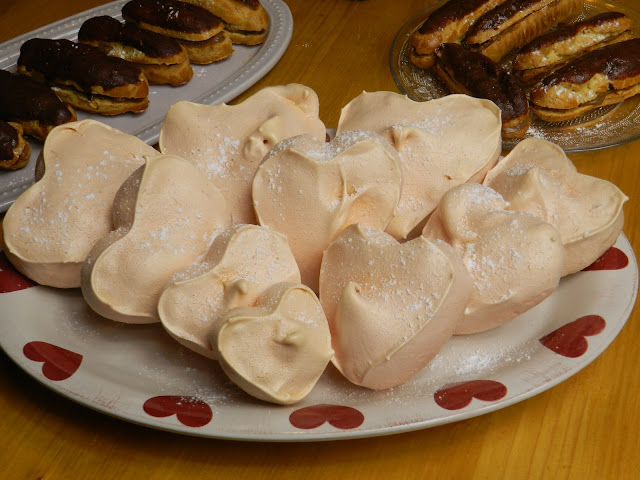
I've been wanting to cook something different recently but didn't take the time so today I thought, why not giving a try to the famous éclairs au chocolat (I much prefer the coffee flavour but didn't have the right ingredients) and because I had some egg white left I decided to make some Valentine's day themed Meringues. You probably all know how much I am fond of meringues so I thought that spicing them up with a little V-Day look would be nice and could give you some ideas for your own Valentine's dinner!
I've found the perfect meringue recipe a few months back and there is no way anybody can fail at this.
What you need:
• 4 egg whites
• 200g of caster sugar
• 1/2 teaspoon of pure vanilla extract (as I don't have any, I usually put less sugar and add a paquet of sucre vanillé)
• 1/2 tablespoon of corn flour
• 1 teaspoon of white vinegar (not essencial here but better!)

You want to beat the egg up to a point where it feels like a shaving foam (yes you heard me!). In a bowl put the sugar, the vanilla and the vinegar. Add the corn flour (better if you sieve it first). Once this is ready, you want to keep beating your egg whites and GRADUALLY add the rest of the preparation (one teaspoon at a time). You can tell it's ready when you can reverse the bowl and nothing falls out of it.
Today, I added some food colouring to the egg whites before beating them (I put 10 drops of red and 10 drops of yellow to create this corally-pinky tone). I used a punch (emporte-pièce) to create a heart shape, put them in the oven (at 200°c) for an hour and Voilà! Very easy, quite cute and ABSOLUTELY DELICIOUS!

Let me know if you try any of this and tell me what your plan is for Valentine's day!

Also, just thought I would share a hairstyle I've tried on Rose recently. Fairly simple but elegant and versatile (I've changed the front bit as you will see).


How is you weekend so far?
I shall speak to you all soon, maybe with a Valentine's day makeup?

Margaux

vendredi 25 janvier 2013

HAPPY NEW YEAR - INTRODUCTION TO ROSE :)


Hello Everybody!
I am very sorry I haven't been here for a while, the beginning of the year is always quite busy for me, I had lots of revisions to do, then exams, then go back to Uni, celebrate my 21st birthday, take resolutions, think about what 2012 has been for me, etc, etc. I meant to post about these last two things but didn't get round to it and it may never happen now since it's already the end of January. Oh well, we'll see.

Right, that been said, HAPPY NEW YEAR :)
I wish you all happiness and health and hope you will have a marvelous year :)

For my 21st, I asked for a Studio light and chose an umbrella type of light (different from a softbox). I'm very happy with the effect so I need to learn how to actually use it properly, etc. I may be back on YouTube soon with tutorials but I thought I was going to introduce you to Rose (my lovely mannequin head) and another hairstyle I did from a photo one of you posted on my wall. I hope you like it, I found it very nice and classy, you can do it on yourself with a bit of practice but obviously you would need rather long hair.

Blogging is quite hard sometimes because there are so many things I want to share with you guys, products I bought and absolutely loved, photos I've taken, looks I've created, things I want to achieve. I hope I can manage to do all this on day.

Anything you personally would like to see or read?

Can't promise anything, but will do my best to be back soon! Until then, Goodbyye!

         Margaux


lundi 31 décembre 2012

CHRISTMAS VIRTUAL "HAUL" AND HALF OF ANNOUNCEMENT


Hello There!

Last article was a mini tiny giveaway but isn't actually red-hot at the moment so I hope, some of you may just take your time to take and choose the right picture! If you didn't know I was doing one, just click here and you'll read everything about it!


Right. Hope you all had a marvelous Christmas and quality time with your family and friends. I was very lucky again this year and thought I would share what I got with you.
I haven't taken pictures of everything but you'll get the idea :)
• Biggest gift is a Professional Mannequin Head / Styling head. (I'm not going to be too talkative about it now but will do in a minute!)
• Beautiful cloche with Violet flavoured sweets in :)
• Fancy Fake Eyelashes: purple ones and feathery black with dark teal polka dots on.
• Cute little mini chocolate cases
Santa Claus Necklace!
Tim Burton Biography
How To: Photography kind of Book
Cutting Mat (60x90cm)
Rotary Cutter (for fabrics in general)

Very happy and grateful I received all that this year. I want to show you my mannequin as it may be involved in some new beauty articles or videos. YES, you heard me ;) I may take the YouTube project back to my life but probably only with hairstyles first. I feel most comfortable with doing hairstyles for the moment but hope it may change in the future!
I'm not going to talk about that too much because I do think it will be one of my 2013 resolutions and I plan on writing an article very soon to share all my resolutions with you all!
Here is Rose (that is her name) and a few hairstyles I've tried on her. I will probably do them in tutorials in the next year, let's hope I actually do it because I personally think they are absolutely stunning. Let me know what you had, what you think of Rose and tell me anything :)
Please don't mind the setting of the photographs, I was just too excited to wait and do it properly!


Merry Christmas and Happy New Year

Margaux